Question about using Premiere Pro.

For some reason when I edit in Premiere Pro, it takes forever to go through all the frames. It says that their is several thousand frames when really it is only 24 frames per second. It will remain on the same frame as I move the curser forward for a long time before making it to the next frame. I think it's just the setting. But I cannot figure out how to set it back to 24 fps in the program. In the program when you go through the footage, the timer display reads like thisL

00:07:59:30859

That 30859 should only go up to 24, as in 24 fps. It did before and I can't figure out how to change it.

Anyone know how? Thanks.
 
Last edited:
What do you mean? Like use the keyboard arrow to move past a frame? I tried that but I have to hit the arrow key hundreds of times before it actually moves past. It is just moving through the footage very slowly and will stay on the same frame for a long time before it gets past it.
 
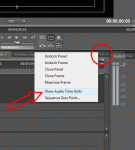
On the right-side of the timeline panel is a dropdown menu, with various options on how to display units. I think you've selected one of the measures for audio units.

I'm loading CS4 to find the menu.

.
 
Here ya go. Make sure Audio Time Units is not checked.

.
 

Attachments

  • Turn Off Audio Time Units.gif
    Turn Off Audio Time Units.gif
    17.3 KB · Views: 116
That 30859 should only go up to 24, as in 24 fps.

No! 00:07:59:00 would be the first frame at 59 secs, so at 24fps the highest frame number will be 23. If you see a frame numbered 24 you are working at 25fps or higher. BTW, as it doesn't cost anything, you might as well get into the habit of setting your time-code starting point correctly. Never start at 00:00:00:00, your FFOA (first frame of action) should be precisely at 01:00:00:00.

G
 
The reason is because it's industry standard and there are two main reasons why it's industry standard, one is to help avoid cock-ups and the other is to avoid equipment getting confused and falling over:

1. Films are made in reels, strangely enough, so are most DCPs even though it's not a technical requirement as far as I'm aware. During editing and audio post production it helps to avoid cock-ups if each reel starts on it's respective hour. Reel 1 @ 01:00:00:00, reel 2 @ 02:00:00:00, etc. This is also common practise for TV, where breaks in the program are required for commercials, each part or act of the program will usually start on the timecode hour. In my experience though some TV stations require a FFOA (First Frame Of Action) time of 10:00:00:00.

2. Not long ago various types of tape machines had to be used during the post production and broadcast process and even today most stations are still not completely tapeless. If your FFOA (First Frame Of Action) starts at 00:00:00:00 then the 2-pop, leader, station ident or any other content the broadcaster or distributor may need to add has to go earlier than your FFOA which means a timecode starting at 23 something, 23:59:30:00 for example. Now if your tape machine is parked at the start of the tape (say 23:59:30:00) and you enter a timecode to locate to, say 00:03:00:00, your tape machine will throw an error because 00:00:30:00 is earlier than 23:59:30:00 so the tape machine will attempt to rewind to 00:00:30:00 rather than fast-forward but it can't rewind because it's already at the beginning of the tape! Having a standard where the FFOA is always at 01:00:00:00 makes this whole thing a non-issue.

G
 
Last edited:
No, you don't have to use this convention if you are doing all the post production yourself in your NLE and if what you are working on is not and will never need to be to industry standards. As it's so easy to do and costs nothing, why not just set your timeline to the industry standard timecode start time and avoid any potential headaches in the first place?

G
 
Well done, Zensteve!

I actually learned something new :)

(But seriously, H44, how did you activate that setting? Are you just checking unchecking stuff all the time without looking???)

PS.
SHIFT + arrow = moving 5 frames at a time
 
I don't remember how I activated it. I came back to help edit my friend's movie after a been away on other people's projects, and then it was activated when I got back.

Since we are on the subject, I am going to export a copy of the edit, for a guy to work on the video, color grading, etc. He wants it in an MOV file. But Premiere Pro does not have a MOV export option. Or does it somewhere?
 
.mov = Quicktime.

Select Quicktime in export settings.

Next question is you ask him what codec/quality he wants.
The maximum you can give is uncompressed, which gives you big files without compression.
On a PC you can't export ProRes from Premiere, so when he says that: you can't.
 
Back
Top